Wednesday, August 18, 2010

SPAM Musubi


My boys love eating SPAM, the western version of Luncheon Meat, and they love sushi too! They get to have sushi for their lunch regularly, but not SPAM. SPAM appears in their meals when Mom is extremely exhausted, ill or there is no more ingredients in the fridge for preparing meals.

This is the Hawaiian version of the Japanese Onigiri. I found this recipe from House of Annie. With the temperatures going up to a high of 33 degree Celsius, and feeling like 38, I just don't feel like cooking! I have only 30 minutes to prepare lunch, after bringing the boys home from their swimming class. Hubby dear had a meeting to attend in the afternoon, and had to be out immediately after lunch.

Ok, I'm finding all sorts of excuses to make this =p
But seriously, this is a no-fuss meal, and it's so easy to prepare!
To feel less guilty, I replace the original SPAM with the less sodium type, and use soy sauce that has less sodium =)

  • Cut SPAM into pieces (not too thin).
  • Do not discard the can. To be use as a mould for later.
  • Heat up a pan. No oil is required.
  • Put the slices of SPAM onto the heated pan.
  • Mix 1 tablespoon of soy sauce with 1 teaspoon of brown sugar.
  • Drizzle the mixture onto the slices of SPAM.
  • Heat the slices for a couple of minutes.
  • Flipped over, and again, drizzle the soy mixture onto the side facing up.
  • Heat for a couple of minutes.
  • Remove and set aside.
  • Using the SPAM can, scoop some rice into it and press the rice down. Put a slice of fried SPAM on top of the pressed rice.
  • Invert the can onto a broad nori strip.
  • Wrap the nori strip around the rice and SPAM slice.


What about the vegetables?


I had some leftover strawberries from baking the Fruit Pastry Cake. I cleaned and cut them up and threw them into the mixing bowl of lettuce trio. WOW! They instantly brighten up the bowl of salad! Mix some honey and mayonnaise together, and you get your salad dressing =)


The cold salad went very well with SPAM Musubi, on a very hot and humid day! The boys love their lunch! Both the musubi and salad were gone in seconds! Tasty!

Thursday, August 12, 2010

Hear the Buzz, DUCK!


It was a very hot day, with temperature at a high of 33 degree Celsius, but feeling like 38. People were either hiding at home with their air-conditioning system on at full blast, or out participating in some water related activity.

I brought the kids to the Splash Park, since our kind neighbour offered to drive us there. There were so many parents and kids at the Park! The boys had fun, and I was glad to be out of our furnace-like apartment. However, a fun day turned out to be a painful day for me! I was stung on the finger by some insect, probably a bee! OUCH!

The sting was so painful that I almost dropped the camera I was holding.
I was walking across the grassy area from the playground to the splash area when I got stung. The only thing I could think of, when stung, was to quickly brush off whatever that was clinging onto my finger! I didn't even see what stung me. When I finally looked at my finger, it was very red and very swollen =(

I endured the pain during our two hours at the park. As I watched the kids play, I overheard some adults saying that they too, were stung by bees.
Ok, it shouldn't be that serious, since they were talking about the bee stung like mosquito bites .... Applying cold compression did help to relieve the swelling. The swelling should subside the next day.

Two days later ...


The swelling didn't go down!
The condition had worsened!

The skin around the insect bite was still red and swollen, and the swelling had spread to the second joint of the finger! No good! Little red spots started to appear on the reddened skin, and the itch was unbearable. I decided to seek medical care at the emergency clinic. If I was back on the little red dot, I would have seek medical attention on the same day ... Sigh!

Verdict? I had a skin infection called Cellulitis. The insect bite probably transmitted the bacteria on the skin, and started the infection.
I was put on a dose of antibiotics, and the swelling should improve within 48 hours ... and it did after half a day ... I'm relieved!

And I am staying away from the Park for a while.
... Hear the BUZZ ... DUCK!

Tuesday, August 10, 2010

Summer and Fruits!


I love Summer in the woods ... warm under the sun, and yet, cool with a slight breeze. No, not the warm air that circulates on the little red dot!
The other reason I like Summer, is because we get all kinds of fruits! All types of berries, navel oranges, apples, and watermelons!

However, summer in the woods this year is hot!
The high has been at 32C!
Where did the cool breeze go?
It is hot and humid, just like back home.

I have to get the kids to drink plenty of fluids. We eat less, and ice cream is a regular on our table. It is difficult to get fruits that can please everyone. Some like berries and oranges, others like apples. Juicy watermelon is great on these hot days, but both the boys refuse to eat them! I love watermelon, but I can't possibly finish a huge watermelon on my own!

What is the solution to getting the boys to increase their fruits intake?


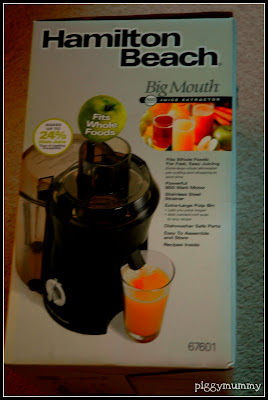
A juice extractor!

All of us love our cold watermelon juice.
The boys love their mixed fruit juices ... apples, navel oranges and carrots.
I love my celery and green apple juice!
Everyone is happy!


Cheers to a healthier diet!

Monday, August 9, 2010

Summer Cake


In most food blogs, this cake is known as Fruit Pastry Cake.
To me, it is a "Summer" Cake.

I can use any kind of fruits found in Summer, to top the cake ... strawberries, blueberries, raspberries, blackberries, cherries, pineapples, and many more! I like the cheerfulness of this cake! It brightens my day!


And the clever use of icing sugar to "dress up" the cake!
在炎热的夏天,带来一丝丝凉意!


Recipe adapted from Happy Home Baking.


100g/7tbsp Butter (Soften)
200g Sugar
50g Sour Cream/Yogurt
3 Eggs (Lightly Beaten)
1 tsp Vanilla Extract
1 tsp Lemon/Orange Zest
1.5 cups All Purpose Flour
1/3 cup Wholemeal Flour
1 tsp Baking Powder
500g Fruits (Tossed with 2tbsp sugar)

  • Grease the sides of a 9" round pan, or 8" square pan.
  • Line the base with parchment paper.
  • Cream Butter and Sugar and Yogurt.
  • Dribble in the eggs gradually.
  • Beat till corporated.
  • Add vanilla extract and zest. Mix to combine.
  • Add flours and baking powder.
  • Mix till smooth.
  • Pour into pan.
  • Arrange fruits on top. Don't press fruits down.
  • If using canned fruits, wash the fruits to remove syrup and omit the sugar. Do not use fruits which are too juicy.
  • Bake in a preheated oven at 180C/350F for 60-70 minutes.
  • Cover top with foil the last 15 mins if the top is getting burnt.
  • Leave cake to cool in pan for 5-10 minutes.
  • Unmold and transfer to rack to let cool completely.
  • Dust with icing sugar.

The aroma of the cake baking in the oven was irresistible!

KW kept asking for more, as he liked the crispiness of the edge of the cake. The cake, however, did not taste as good when left overnight. Putting it back into the oven to bake for a little while helped in bringing out the flavor of the cake again. The next time I bake it, I will use bananas to top the cake, and add some mashed bananas into the cake. Everyone in the house love bananas, but not everyone like strawberries!

Sunday, August 1, 2010

Baked Tilapia


It's one of those days when you take out the tilapia fillets and stare real hard at them. You are at a loss.

How should I cook the fish?
What seasoning should I use?

I don't feel like cooking. Take-out sounds good.
Then reality sets in. I'm back in the woods!
Ok, I have to cook =(

With the temperature hitting a high 80F, and I was melting like a stick of butter, I decided to just send the tilapia fillets into the oven. I grabbed whatever I had in hand to season the tilapia fillets, keeping my fingers crossed that they would turn out "edible".

Lemon Juice
Garlic Powder
Paprika
Ground Black Pepper
Dab of Butter

  • Line a baking tray with parchment paper.
  • Clean and dry the thawed tilapia fillets.
  • Pour some lemon juice onto each fillet.
  • Sprinkle some garlic powder, paprika and ground black pepper onto both sides of the tilapia fillets.
  • Add a tiny dab of butter onto the fillet.
  • Bake at 400F till the fish is done.
  • Serve warm.

The fillets didn't turn out too bad. I liked the lemony taste present in the tilapia fillets while the boys liked the buttery taste. Each of them had a fillet and finished it!

Related Posts with Thumbnails