Monday, November 30, 2009

Panko Shrimps with Sweet and Sour Sauce


I had a big of prawns sitting in the freezer, waiting to opened.
Darling son KW doesn't really like prawns, but hubby dear and darling son YW love it! In order for darling son KW to eat the prawns, I decided to "dress them up"! He gave me the "thumbs up" during dinner =)

Deep Fried Panko Shrimps

20 pcs Raw White Shrimp
1 cup Corn Flour or All Purpose Flour
1 Egg, lightly beaten
1 cup Panko (Add some grated Parmesan Cheese if you like)

  • Deveined and remove tail of shrimps.
  • Wash and dry the shrimps.
  • Coat the shrimp with flour.
  • Dip the flour-coated shrimp in egg.
  • Lastly, dip the shrimp in Panko or breadcrumbs.
  • Heat up a pan of oil.
  • Deep fry the coated shrimps till golden brown.
  • Keep the deep fried shrimps warm in a slightly heated oven.


Sweet and sour sauce is usually the dipping sauce for prawns.


I had no idea how to go about making the sauce actually. Since I was in a mood to experiment with the ingredients, I just mixed whatever I think would taste good! I was very glad the sauce turned out well. The taste of the sauce was right ... sweet and sour indeed, and very appetisting!

I was a little too generous with the amount of ingredients used, and ended with a big bowl of sauce. It worried me a little that I might have too much leftover. Having noodles with the sauce for dinner would be a good way to finish the bowl of sauce, but I had already cooked rice. The boys and the man liked the sauce so much, they polished off their rice and the sauce! Phew!

Sweet and Sour Sauce

5 tbsp Tomato Ketchup
2 tbsp Sugar
1 Carrot, Peeled and Cubed
1/2 can Crushed Pineapple with Juice
1/2 can Canned Mushrooms
1/2 Yellow Onion
1 tbsp Corn Flour
2-3 tbsp Water

  • Heat up a pan.
  • Add 1 tbsp of oil and fry the diced onion till fragrant.
  • Add the canned mushrooms and carrots.
  • Add a little water, cover and cook till carrots are soft.
  • Mix the tomato ketchup and sugar.
  • Pour into the pan of mushrooms, carrots and onion.
  • Add the crushed pineapple and a little of the juice.
  • Add the cornflour mixture slowly to thicken the sauce.
  • Adjust the amount of cornflour mixture used, depending on the desired consistency of the sauce.

My kitchen, my laboratory! Yeah!

Saturday, November 28, 2009

ABC Soup


I love soup and I love this ABC Soup!
I don't know why it's called ABC soup.
Maybe because the ingredients used are simple, and cooking it is as easy as ABC? Or is it because it's full of Vitamins A, B and C?!

Hubby dear cooked this (after researching on the internet on how to cook it) on Saturday evening, since it was a long Thanksgiving weekend. The elder boy loved it so much, he had three bowls of soup for that evening! We omitted some ingredients which are normally used, like potato. I think the next time we cook it, we can add a ear or two of corn into the soup ... YUM!


Ingredients

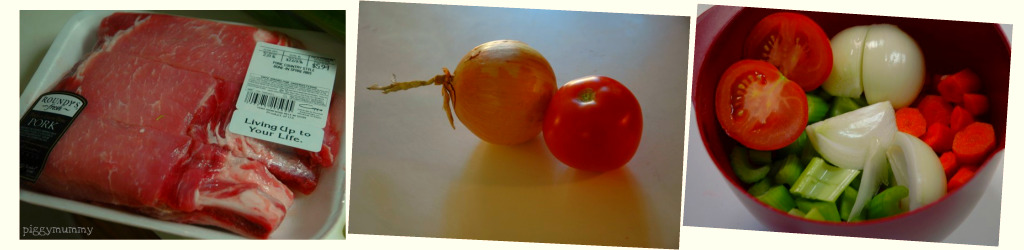
1.5 lb Pork Spareribs
1 Large Yellow Onion
1 Large Tomato (You can add more if you like)
4 sticks Celery, Diced
4 sticks Carrots, Diced
2 ears Corn, halved (Optional)
2 Potatoes, Peeled and Cubed (We omitted this)
1.3 litres Water

  • Remove any traces of fats from the spareribs.
  • Blanch the spareribs in boiling water for a couple of minutes.
  • Rinse the spareribs in cold water.
  • Prepare a big pot and fill it with water.
  • Put all the ingredients into the pot.
  • Bring the water to a boil.
  • Lower the heat, and let it simmer.
  • Cook the soup for 2 hours.
  • Remove the thin layer of oil, if any, with a spoon.

This soup is very sweet, and not too oily, as hubby dear did a good job in removing most of the fats on the spareribs.

Thank you dear, for the delicious soup ... I really miss drinking it!

Thursday, November 26, 2009

Rainbow Fried Rice


Don't you think the fried rice is very colourful?
There's the green from broccoli, red from chinese sausages, black from chinese mushrooms, yellow from egg, and orange from carrots. And there's a whole lot of vegetables in the rice! I call this dish ... Rainbow Fried Rice!

Hubby dear wanted to cook dinner, since it's a long Thanksgiving weekend. I got get some rest too, since he would be cooking. However, he had only a vague idea of what to put in for the fried rice, so I helped in preparing the ingredients. As it was his first time frying chinese sausages, he was not too sure when he should add the rice. So the rice and sausages were added into the pan the same time. I tried to put the rice aside while frying the sausages. Chinese sausages have a high percentage of fats in them, so when frying, no oil is needed. There will be some oil left the pan, after the sausages are fried. The rice can be fried in this little sausage oil then.


Ingredients

2 Chinese Sausages, diced
12-14 Dried Chinese Mushrooms, reconstitue in water and sliced
1 Carrot, peeled and cut into thin sticks
1 Small Yellow Onion, diced
2 cups Cooked Rice
1 tbsp Oyster
1 tbsp Oil
2 Eggs
1.5 tbsp Soy Sauce
1 tbsp Sugar


  • Cook rice, and let cool. Alternatively, you can cook extra rice the day before, and keep in the fridge. The rice has to be cold before frying.
  • Reconstitue the dried chinese mushrooms in water. Squeezed the water out from the mushrooms, and sliced.
  • Marinate the sliced mushrooms in : 1 tbsp Soy Sauce + 1 tbsp Sugar.
  • Set aside for at least 15 minutes.
  • Add 1 tbsp of oil into a heated pan.
  • Add onions. Fry the onions till and fragrant.
  • Add seasoned sliced mushrooms. Fry for a while.
  • Add carrots and broccoli.
  • Add some water, cover the pan.
  • Let cook till the carrots and broccoli have softened.
  • Alternatively, microwave the vegetables first before adding them.
  • The vegetable stir fry should not be too watery. Add some oyster sauce to taste if you like it more salty. We are ok with nothing added, as the mushrooms gave the mix some taste.
  • In another heated pan, fry the chinese sausages. No oil is needed for frying.
  • When the sausages are done, remove, and set aside.
  • Add rice into the heated pan. There should be some oil from frying the sausages.
  • Loosen up the rice, and add 1 tbsp of oyster sauce. Mix well.
  • Add eggs, and mix well with the rice.
  • Add the cooked sausages and mix well.
  • Add the cooked vegetables. Scoop the vegetables from its pan and drain, if the pan of vegetables is more watery than what you desired.
  • Stir well and serve warm.

There's lots of vegetables in this dish. You can add whatever vegetables you have in hand. The seasoned mushrooms and the chinese sausages add a nice sweet chewy touch to the pan of fried rice.

As a side dish, I oven-baked some chicken wings. The nice thing about baking wings is that you can flavor the wings with whatever you have in the pantry or fridge. Some alternatives to marinating the wings:

a) Lemon Juice, and add a dash of Italian herbs to cornflour.
b) Lemon Juice, and add a dash of grated Parmesan Cheese to cornflour.
b) Shaoxing Wine and a dash of salt
c) Shaoxing Wine and some grated ginger
d) Salt
e) Soy Sauce
f) Oyster Sauce

  • Coat the marinated wings in corn flour. Shake off excess flour.
  • Arrange wings on a baking tray lined with parchment paper.
  • Bake at 425F for 20 minutes.
  • Turn the wings over and bake for another 10-15 minutes.
  • Switch to Broil function and broil for another few minutes to get a crispy skin.
  • Keep warm in the oven till ready to serve.

I'm glad I omitted the butter this time. The wings were crispy, and there was no oil in the tray when I took the wings out. It was a very simple, but tasty dinner on Thanksgiving Day! The kids gave their Papa ... Two thumbs UP for the Rainbow Fried Rice ... YUMMY .. they said! The next dish by hubby dear? ABC Soup, he said ... I'm looking forward that!

Wednesday, November 25, 2009

Nutella Swirl Cake/Cupcakes


I used to bake these back on the tiny island called the Little Red Dot. Mini Nutella Swirl Cupcakes, to be exact. I love mini bakes ... small enough to be popped into the mouth, especially when you need a snack while working. However, I do not have any mini muffin pans with me in the woods. Since hubby dear will need to stay back late in the laboratory tomorrow evening to finish his experiments, I used my loaf pans to bake as cakes instead of cupcakes. He can share the mini-loaf with his classmates, while the boys and I have can share the bigger loaf at home!


Recipe from I heart CuppyCakes


10 tbsp (140g) Butter, softened
3/4 cup Sugar
3 Eggs
1/2 tsp Vanilla Extract
1 3/4 cups (200g) All Purpose Flour
1/4 tsp Salt
2 tsp Baking Powder
Nutella About 1/3 cup (I just scoop what I need)


  • Preheat oven to 350F, since I am baking a cake instead of cupcakes.
  • If baking cupcakes, preheat oven to 325F instead.
  • Cream butter. Gradually add sugar, and cream both till light and fluffy.
  • Add eggs, one at a time.
  • Add vanilla extract.
  • Stir in Flour, Salt and Baking Powder.
  • Fill one third of the loaf pan with the batter and spread evenly.
  • Spread a thick layer of Nutella on the batter.
  • Top the Nutella with batter and fill the pan to 2/3 full.
  • Top the batter with more Nutella. Swirl the Nutella with a toothpick.
  • Fold a bit of the batter over the Nutella.
  • Bake at 350F for about 25 minutes or till done.

This is a "Once-in-a-long-While" type of cake as the amount of butter is too much to my liking. I omit the frosting, as I find cakes with frosting a tad too sweet for my taste buds. The cake itself is sweet without the frosting, and the sides are a little crispy. The Nutella moistens the cake and it makes a good after school snack!

Tuesday, November 24, 2009

Want An Apple, Tooth Fairy?


Dear Tooth Fairy,

You love visiting me when I'm eating my fruits.

Were you around when my first milk tooth fall out?
Last Fall, I was at a place far away, watching the many colourful kites flying in the sky. Maybe you were afraid of getting caught by the many kites, so you didn't come and look for me ... Was that why I couldn't find my tooth when it came out, because you were not around?

You came when my second tooth fell ... just when I was eating my melon!
It got stuck in the melon!

This fall, the third tooth came off in class. I was using my tongue to push it because I was bored listening to my teacher talked. It just came off ...
I wrapped it in a piece of paper and brought it home for my mom to see =)

You visited me again, this evening, when I was eating my apple! Again, the tooth was stuck in the apple ... it came off just when my mom reminded me to be careful not to bite the apple with the loose tooth ....

My mom said to me ... fruits are not only good for you, they help to remove your loose tooth, in a painless way! I think she is right! Tooth Fairy, will you visit again the next time I eat a piece of fruit? Hopefully, a melon ...
it's neater than having a slice of apple pulling the loose tooth off.


Baked Soy Oyster Sauce Chicken


The oven, my good friend. A great helper in dinner preparation.

Baked soy oyster sauce chicken thighs .... I used to marinate chicken wings, instead of chicken thighs. Instead of baking the wings, I fried the wings in some sesame oil until half cooked, poured the marinade, together with some water and braised the wings till fully cooked. The stove would be covered with spots of sesame oil as the wings fried in the pan. Imagine the amount of cleaning up after cooking!

Being in an adventurous mood one day, I decided to use the marinade on the packet of chicken thighs I purchased. I knew I couldn't fry the thighs, as it would take ages for me to fry these thick pieces of chicken parts. Baking would save me all the trouble of cleaning up!

I baked the chicken thighs in a baking tray lined with aluminium foil.
The dish didn't disappoint us! The chicken meat was very tender, unlike chicken breast meat. However, the oil from the chicken skin after cooking, plus the sesame oil used in the marinade, was a little more than what I had expected. But all I needed to do was to try to skim off the oil with a metal spoon before serving .. not too bad after all, since the gravy would be poured over the blanched Bak Chok, which needed some oil anyway.

6 Chicken Thighs
2 tbsp Dark Soy Sauce
1-2 tbsp Soy Sauce (I used Kikkoman's Low Sodium Soy Sauce)
1 tbsp Oyster Sauce (I used Shitake Flavored Vegetarian Stir-Fry Sauce)
1 tbsp Sesame Oil
1 tsp Sugar
A few dashes of ginger powder or grated ginger from a 2cm knob of ginger.

  • Put chicken thighs and marinade in a ziploc bag.
  • Mix well and marinate for at least two hours or overnight if possible.
  • Line a baking tray with aluminium foil.
  • Transfer the chicken thigh and marinade into the baking tray.
  • Place the chicken thighs with skin side down.
  • Cover the baking tray with another piece of aluminium foil.
  • Bake at 425F for about 30 minutes.
  • Turn the chicken thighs. Continue baking with the aluminium foil covering the tray.
  • Bake for another 20 minutes, or till the meat is cooked through.
  • Leave in oven to keep warm, with aluminium foil covering the tray, till ready to eat.
  • Skim the layer of oil away before serving, if necessary.
  • Serve with blanched vegetables like Bak Choy, Spinach, and a bowl of steaming hot rice.

Minimum cleaning, no oily spots on stove. Yeah!

Instead of eating it with a bowl of rice, you can pour the gravy over some noodles and have your plate of chicken noodles! Dont like the soft skin? Just before serving, broil the chicken pieces for a few minutes to get that crispy skin! But make sure you don't leave the thighs under the broiler for too long or they will burnt.

Hmmm ... Enjoy!

Monday, November 23, 2009

Creativity and Drawing


Give kids some time to observe, and give them the space to be creative, and they will come up something to surprise you =) At least that's the case with my two boys.

Darling son KW loves construction vehicles.


When he was younger, about age 2+, he would use his many mini construction vehicles and wooden bricks, and set up his own construction site. We would roll little paper balls for his bull-dozer, and he would transport the wooden bricks in his bigger dump truck! Our estate was undergoing upgrading then, and there were plenty of construction vehicles moving in and out each day ... dumptrucks, cranes, bulldozer, excavators and cement mixer trucks. He would stand outside the coffee shop for hours, with grandm who came over for her weekly visit, and watched as the workers operated the vehicles.

We never told him "Can you draw what you see at the shop for us?". All we did was supply him with the drawing materials and paper. If he felt like drawing/scribbling/tearing the paper, he knew where to get his supplies. After many weeks of playing with his construction vehicles, and watching the workers, he drew his first vehicle at grandma's house one weekend .... We couldn't believe what we saw and had to ask his grandma again and again if she helped him with the drawing. No, came the answer. "I looked at the vehicle and drew it on my own.", said the boy.


Can you see the difference between two drawings, and the last two? He has since progressed from freehand drawing at four years old, to using a ruler at six! Again, no one told him to use a rule in his drawing.

How about his little brother?
He has been observing his elder brother draw. But he wasn't very keen in drawing. He was more keen in tearing up paper and sticking them onto another piece. It was only when we moved into the woods, and allowed them to plaster our living walls with their drawing that he took a keen interest in drawing. As with all kids, he started with 'stick figures', and flowers. "Mama loves flowers, so I draw more for her" the boy would say ... so sweet of him (when he is not throwing a tantrum). Then came the "gingerbread", Mario, and family portraits. Next came the Rock Monsters in the Power Miners!


The latest craze? Dinosaurs!
All thanks to PBS's "Dinosaur Train"!
Library books on dinosaurs, both factual and fiction, sat on our book shelf at the moment.


They learn all the big words from the show ... Paleontologist, theropods and names of many dinosaurs. They are better at naming the dinosaurs than I do! No, we didn't draw any dinosaurs for him. Having read the books, and watched the tv programme, he concluded that "a dinosaur has four legs, a long tail, and sharp teeth". And hence, the drawings. I was pleasantly surprised to see the drawings, which he did last night before bedtime, and this morning before going to school. I love the dinosaurs drawn!

Maybe he will start drawing snowmen and Santa Claus, since Christmas is coming?

Related Posts with Thumbnails