Tuesday, October 26, 2010

Halloween Bento!


It's difficult to avoid preparing one for the boys, when the Internet is filled with such beautifully done Halloween-themed Bento!

The kitchen in the morning is always a battle-zone.
Cooking lunch, packing lunch, preparing breakfast ... and all these on top of getting the boys out of their beds to go brush their teeth, change out of their PJs, pack their bags, and get down for breakfast! Wish I had more hands to do more things! Doing a beautiful bento is out of the question, as firstly, I'm not an expert in "Lunch Art". I couldn't quite decide what to put, and where to put. Of course, there's the "How To". Hence, I decided to do some planning the day before packing a Halloween-themed Bento =)


The sketch didn't look too bad!
I was happy after deciding on the "How To"!
The tasks for the morning will be :

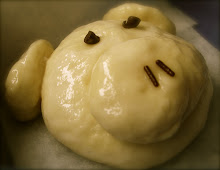
Shape rice into a "Ghost" using plastic wrap.
With a cutter, cut the eyes and mouth.
Cut a bow tie from a slice of cheese.
"Ghost" is done!

Bake the fish fingers in the oven.
Let cool and place on a liner.
Cut out small squares and place on tip of the fish fingers.
Use a little mayo to stick the cheese onto the fingers.
"Fingers" are done!

Fill up the rest of the space with the cooked broccoli.
Form face with cheese and nori.
"Frankenstein" done!


After the first lunch box, I realised that I couldn't really see the eyes and mouth of Frankenstein! So instead of using nori, I changed to using cheese. The effect was a lot better than just using nori alone =) So here's the two Bento lunches for my two little darlings!

The boys went out of the house later than usual, because I was busy taking photos of the bento! It's not an everyday affair that I made such bento.
Thank you, Tiffany, for sharing with us in your blog, how to make a ghost using rice!

I had fun preparing the Bento, and I hope the kids enjoyed their bento in school!

Thursday, October 21, 2010

The Goose That Laid The Golden Egg


It's an yearly affair.

Darling son KW's teacher, will put up a play every year. The kids practiced hard and performed for parents. As part of their rehearsal, they performed for invited students from other classes. Last year's plays were all about Soup, in conjunction with the National Soup Month. This year's theme was : Fables and Fairy Tales. Last year, KW played a soldier in "The Stone Soup", while this year, he was the Narrator of the play "The Goose That Laid The Golden Egg".

Although the plays were 5 to 10 minutes each, it was an enjoyable experience, sitting there and watching the kids performed. Some were nervous, while a handful, were enjoying themselves and having fun while performing. The kids were each given a big cardboard, and they were to "design" the costume for their role on their own. So we saw three different elephants, three pigs, a wolf, an ant, a bee, a sheep, a mole, a duck, and of course, the Goose!

It was really hilarious when the farmer killed the Goose. This scene was carried out behind the art easel. We didn't see the killing, which was good, cos I'm not for violence and killing. The farmer and the Goose went behind the art easel ... the Goose screamed, and the next thing we saw, was feathers flying out from behind the easel. It was enough to get group of parents laughing.

A big thank-you to the Farmer, his wife, the Goose, the hen, the cow and the sheep, and our darling Narrator KW, for providing us with a morning of fun and laughter! And a big thank-you to the teacher too, for providing an opportunity for the kids to perform. I'm sure it was a great learning experience for the kids!

Wednesday, October 20, 2010

Baked ShaoXing Chicken Thigh Fillet


Sometimes, I craved for fried chicken pieces ... succulent with crispy skin ... wooo. Never mind that it is loaded with lots of fats. But seriously, I'm just too lazy to fry them in a pan. The frying part is not difficult. It's the cleaning up after the frying that I dislike. The oil will splatter onto the entire stove, the knobs, the counter top beside it, and the pots and pans that are just lying around the frying pan. Oh, and the oily floor .... sigh.

By accident, I found that using the oven, baking at a high enough temperature, yielded that same results as frying the chicken piece in a pan! I'm delighted!

  • Debone the chicken thigh, with skin attached.
  • Cut a few slits, about 1 cm apart, on the back of the chicken piece.
  • Clean and pat dry.
  • Marinate with some Shaoxing Wine for at least 20 minutes.
  • Discard wine, and place chicken fillet on a piece of parchment paper in a baking tray.
  • Season with some sea salt and ground black pepper.
  • Bake at 425F till browned and crispy.
  • Remove and serve warm.

The skin is as crispy as when you pan fry the chicken! I love it! No oily mess to clean, and I'm free to do whatever I like as the chicken pieces bake in the oven! It's good for packing into the kids' school lunchboxes too! The kids came home with an empty lunch box =)

Friday, October 15, 2010

Green Chilli


Very often, we take things for granted.
Simple things in life.

I have always taken green chilli for granted. Those green chillies which add to your "zhichar" noodles or wanton noodles. Whenever we eat out at hawker centres, the jar of green chillies is always there for us. You have a choice not to take it, but if you want it, it's always there for you.

But when you are far away in the woods, most things have to be made from scratch. No green chillies to go with your wanton noodles. Even the chilli sauce tastes different. No sambal chilli, no nasi lemak, no char kway teow, no sausage buns. You want them, you think of a way to make it.


I'm beginning to fall in love with those Jalapeno Peppers. They seem to be a good choice for making green chillies, the kind that you eat with your wanton noodles. So I decided to give it a try. The ingredients are not expensive, so no heartache even if I fail =)

Jalapeno Peppers
Distilled White Vinegar
Sugar

Yes, it's that simple.
Wash and clean the peppers.
Cut the peppers, and with the seeds, put them in a bowl.
Sprinkle some sugar over the peppers and mix well.
I use a tablespoon of sugar for 6 peppers.
Add more sugar if you like your chilli sweeter instead of sour.
Put the peppers into a small jar.
Pour enough vinegar to cover the peppers.
Keep in the refrigerator for at least two days before eating.


Wow! The peppers, despite soaking in the vinegar for two days, have a crunch to it, unlike those back home. I like its spiciness, and with a tinge of sweetness. The sour taste is a tad too strong for hubby dear, so I will add more sugar the next time I make it.

I miss it so much, I can eat just eat it with plain rice! YUM!

Friday, October 8, 2010

Marble Cream Cheese Cake


I knew I had to bake it when I saw it on House of Annie.
Thanks, Annie, for sharing the recipe on your blog.
My boys love the cake! So do I =)


Chocolate Cake Batter

180g Butter
170g Sugar
20g Cocoa Powder
120g Self-Raising Flour
or
120g All Purpose Flour + 1.5 tsp Baking Powder + 0.5 tsp Salt
1 tsp Baking Powder
3 Eggs

  • Cream butter and sugar till creamy.
  • Beat in eggs one at a time.
  • Fold in dry ingredients and mix thoroughly.
  • Divide batter into half. Set aside.

Cream Cheese Batter

250g Cream Cheese (I use one block, which is less than 250g)
60g Castor Sugar
1 tsp Vanilla Extract
1 Egg

  • Beat all ingredients and mix well.
  • Pour half the Chocolate Cake Batter into a 7" round/square pan.
  • Pour all the cream cheese batter on top.
  • Pour the remaining Chocolate Cake Batter on top of the cream cheese batter.
  • This layer is quite thin, so just try your best to cover.
  • You can swirl with a chopstick to get the marble effect, or leave it as it is.
  • Bake in a preheated oven at 350F for about 1 hour, or till skewer comes out clean.
  • Remove from oven and leave to cool completely before slicing.


I am going to bake this cake again!

Wednesday, October 6, 2010

Jalapeno and Spices Chicken


Hubby dear loved the jalapeno sauce so much, I just had to cook it again!

Since I still had some jalapeno peppers in the fridge, I decided to cook it once again! Yes, I couldn't resist the aroma of the minced garlic, ginger and jalapeno peppers frying in the pan either!

Instead of using prawns, why not try chicken thigh fillets?

I used 3 chicken thigh fillets, skin removed, and cut them into bite size cubes. Cleaned them, pat dry, and set aside for frying later. Proceed to prepare the 5-spice mixture, and mince the garlic, ginger and jalapeno peppers. I find mincing and chopping therapeutic!


3 Cloves Garlic, minced
1'" knob Ginger, minced
1 Jalapeno Pepper, deseeded and cubed

1 tsp 5-spice Powder
1/2 tsp Sea Salt
1 tsp Ground White Pepper
2 tsp Mirin


  • Heat up a pan.
  • When hot, add a tablespoon of butter and a tablespoon of vegetable oil.
  • When the oils are hot, add the minced garlic, ginger and jalapeno peppers.
  • Fry till fragrant.
  • Add the 5-spice mixture.
  • Stir well.
  • Add the chicken pieces and fry till cooked.
  • Coat the pieces well with the sauce.
  • Serve warm with a bowl of steaming hot rice.


Again, it's aga-ration. Like I said, my recipe book is not with me. It didn't turn out too salty, phew! Again, it's free play ... add more salt, or use less salt.

Serve this dish along with some blanched vegetables, like bak choy, broccoli or cauliflower. Eat this dish with a bowl of steaming hot rice, on a chilly autumn afternoon ... Awesome!

Tuesday, October 5, 2010

Jalapeno Spice Sauce Noodles


We invited some friends last Friday, and I took a recipe from the book, Williams-Sonoma : Food Made Fast Asian, to try. The salt and pepper prawns was a delightful dish! The prawns had a crunch to it, and the sauce ... Mmmm .... Hubby dear liked the sauce so much, he asked me to make it again. However, the book was with my friend, and I could only cook based on what I remembered. Proportion-wise .. it's just an estimate .. aga-aga (Hokkien).

Instead of coating the prawns with flour and searing them on a heated pan, I pan-fried the prawns (cleaned, deveined, and pat dry) with some butter. No salt, no other seasoning. Of course, no mess from trying to coat the prawns with flour. The prawns took less than 5 minutes to cook. After frying, I cooked the egg noodles as per the package instructions, and set it aside when done. Then I proceed to prepare the 5-spice mixture, and started mincing the garlic, ginger and jalapeno peppers!


1 head Garlic, minced
3" knob Ginger, minced
2 Jalapeno Pepper, deseeded and cubed

1 tsp 5-Spice Powder
1 tsp Sea Salt
1 tsp Ground White Powder
4 tsp Mirin

16 Large Prawns - Remove shells, deveined, cleaned and pat dry


  • Heat up a pan.
  • Add a tablespoon of butter, and two tablespoons of vegetable oil to the heated pan.
  • Add the minced garlic, ginger and jalapeno peppers when the oils are heated through.
  • Stir fry till fragrant.
  • Add the 5-spice mixture and give it a quick stir.
  • Add the noodles and mix well with the sauce.
  • Add the cooked prawns and mix well.
  • Turn off heat.
  • Serve warm with some blanched Bak Choy.


The aroma of the garlic, ginger and jalapeno peppers filled the apartment, and hunger pangs striked. I wanted to take photo of my hubby's plate of noodles, as the plate look nicer with the noodles in it. But he was so hungry, he started eating before I could take any photos! Hence the not so nice plate was used for photo taking .....

Well, since it was just an aga-ration (Hokkien for estimation), the sauce turned out a little too salty for my taste buds. But hubby dear found it ok. The vegetables did a good job in balancing the saltiness of the sauce. Feel free to reduce the salt, or add more salt. I guess I had to cook this more often to get the proportion of the spice mixture right, instead of just using estimation.

Monday, October 4, 2010

Shallot and Cilantro Minced Turkey


The bunch of fresh cilantro had been sitting in the fridge for a couple of days. I bought them to prepare a dipping sauce last Friday. I used only a few stalks, and there was still a fairly big bunch left. Since hubby dear would be having his lunch at home, I took the opportunity to include cilantro in my cooking!

1 Shallot
1 Small bunch of fresh Cilantro, minced
150g Minced Turkey/Chicken
Some sea salt

  • Heat a pan.
  • When hot, add a tablespoon of butter and a tablespoon of vegetable/olive oil.
  • When the oils are heated through, add the chopped shallots.
  • Add a dash or two of sea salt.
  • Fry the shallots till fragrant.
  • Take care not to burn the shallots.
  • Before the shallots browned, add the minced meat.
  • Stir fry till the meat is cooked and browned.
  • Remove from pan and into a bowl.
  • Add the chopped cilantro.
  • Serve with a bowl of steaming hot rice.

This dish is rather dry, so if you prefer some sauce over your rice, then this is not the dish for you. I like that no marinating is required. The flavor of shallots is infused into the meat through the oil. Just the right amount of saltiness. And a subtle taste of cilantro as you bite into a spoonful of the fried minced meat. Not bad if you need to use up a bunch of cilantro, and do a last minute dish.

Saturday, October 2, 2010

Noodles in Shallot Oil


We love noodles!
Egg noodles, angel's hair, soba, udon.
You name it, we eat it =)

I usually cook noodles or pasta over the weekends. My boys don't really like mushrooms, especially chinese mushrooms. But I find that the chinese mushrooms give this dish that extra 'crunch'. Oh well, as long as they eat their vegetables ... yes, that's why the broccoli is in the dish. I try to give them more broccoli than mushrooms when I scoop the noodles onto their plate. No complaints from them about the noodles and broccoli.


1 Box Baby Portobello Mushrooms or any fresh mushrooms
4 Cloves Garlic, minced

8 -10 pcs Chinese Dried Mushrooms
2 Heads Shallots, minced

1 head of Broccoli - Cut into florets
Egg Noodles - Serves 3 adults


  • Reconstitute the dried chinese mushrooms in hot water.
  • When soften, drain and slice.
  • Marinade the sliced mushroom with a little sugar and soy sauce.

  • Cook egg noodles according to the instructions on the packet.
  • Rinse in cold water and set aside.

  • Heat up a pan.
  • When hot, add a tablespoon of butter and a tablespoon of olive oil.
  • When the oils are heated through, add the minced garlic.
  • Fry till fragrant.
  • Add the sliced portobello mushrooms.
  • Fry till soft and cooked.
  • Remove mushrooms and set aside.

  • Heat up pan again.
  • When hot, add a tablespoon of butter and two tablespoons of olive oil.
  • When the oils are heated through, add the chopped shallots.
  • Fry till fragrant.
  • Add the chinese mushrooms and fry till soft.
  • Add the portabella mushrooms and blanched broccoli.
  • Add the egg noodles.
  • Add some chicken stock if too dry.
  • Toss the noodles to mix with the oil and both mushrooms.
  • Turn off heat and remove from pan.
  • Serve warm.

Since we had the vegetables and the carbohydrates, it's time to add some protein to the meal!

Served along side with the noodles and vegetables is a piece of baked salmon and a bowl of apple soup.


Clean and pat dry the salmon fillet.
Line a baking tray with parchment paper.

Season the salmon fillet/s with some sea salt, lemon juice and ground black pepper.
Add some melted butter to the salmon fillet. If you find butter too unhealthy for you, use olive oil instead of melted butter. For me, I just cut a thin slice of butter and top the salmon with it.
Put the salmon fillet, skin side down, on the lined tray.

Bake in a preheated oven at 400F, for about 20 minutes, or till cooked.

Enjoy!

Related Posts with Thumbnails