Monday, February 28, 2011

Ghost from Mario Bros


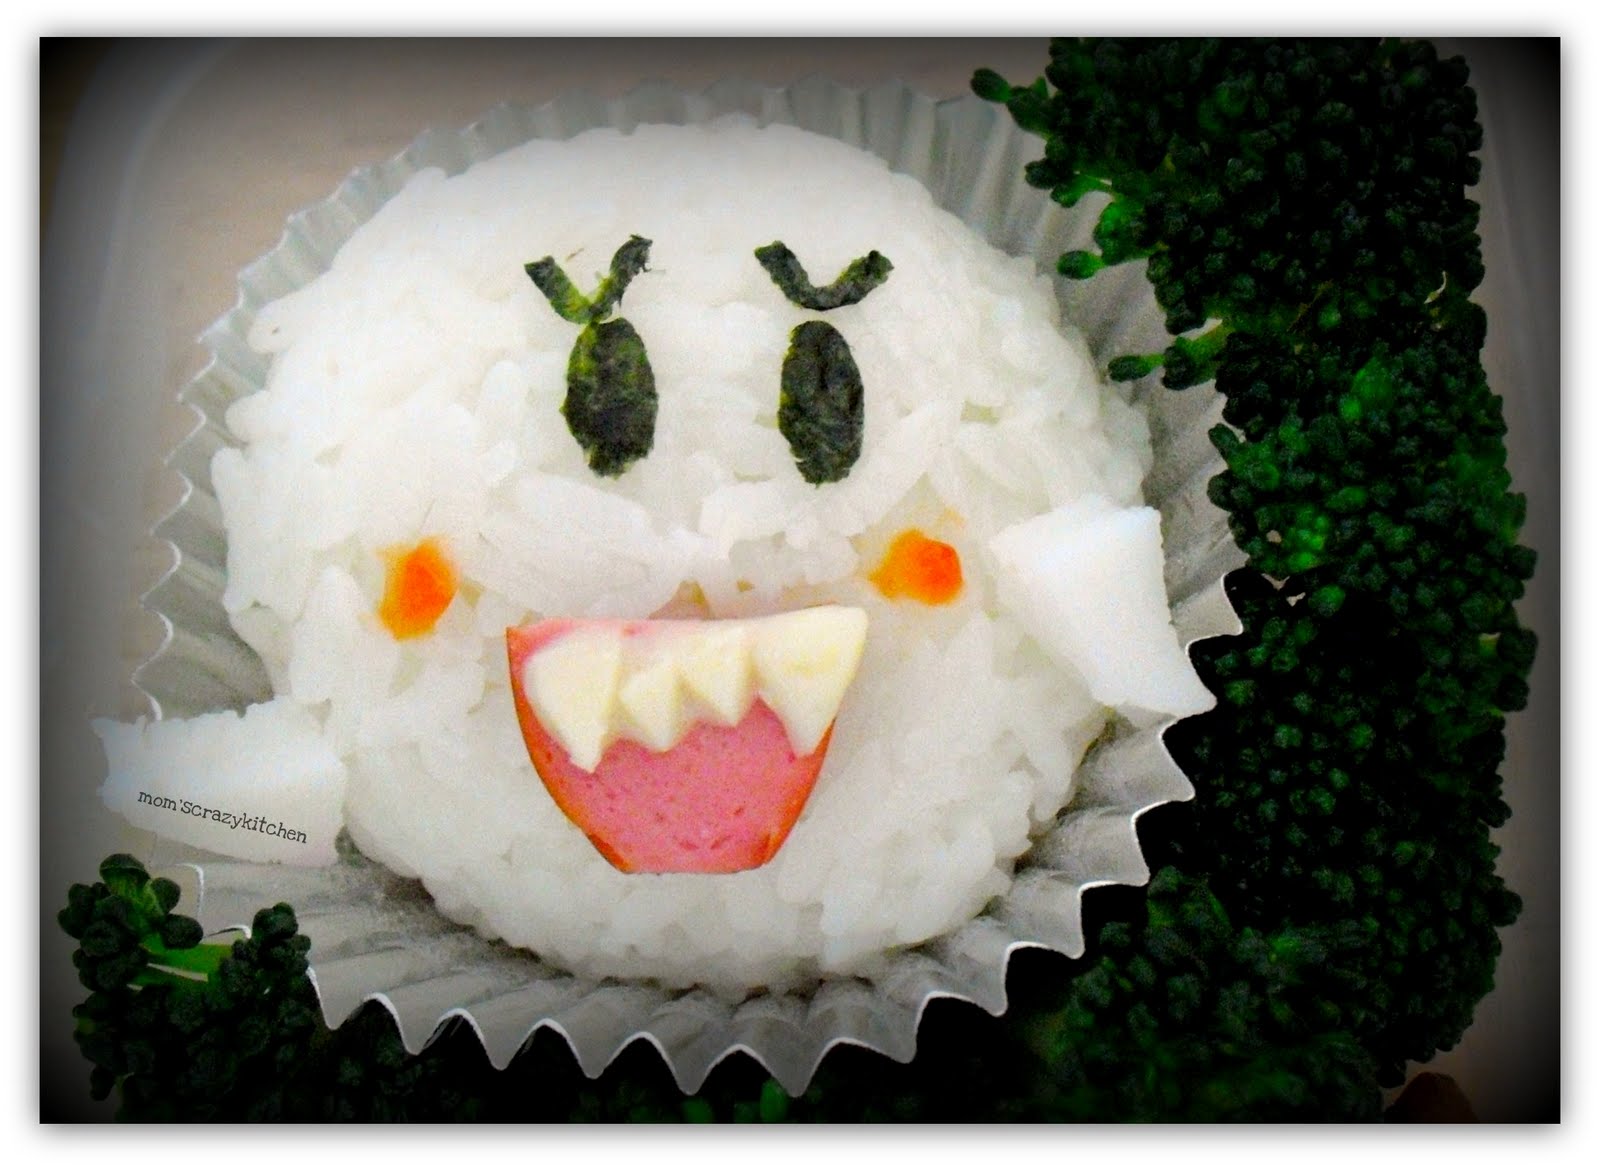
Do you know where the ghost is from?
Yes, it's the annoying ghost from Super Mario Bros.


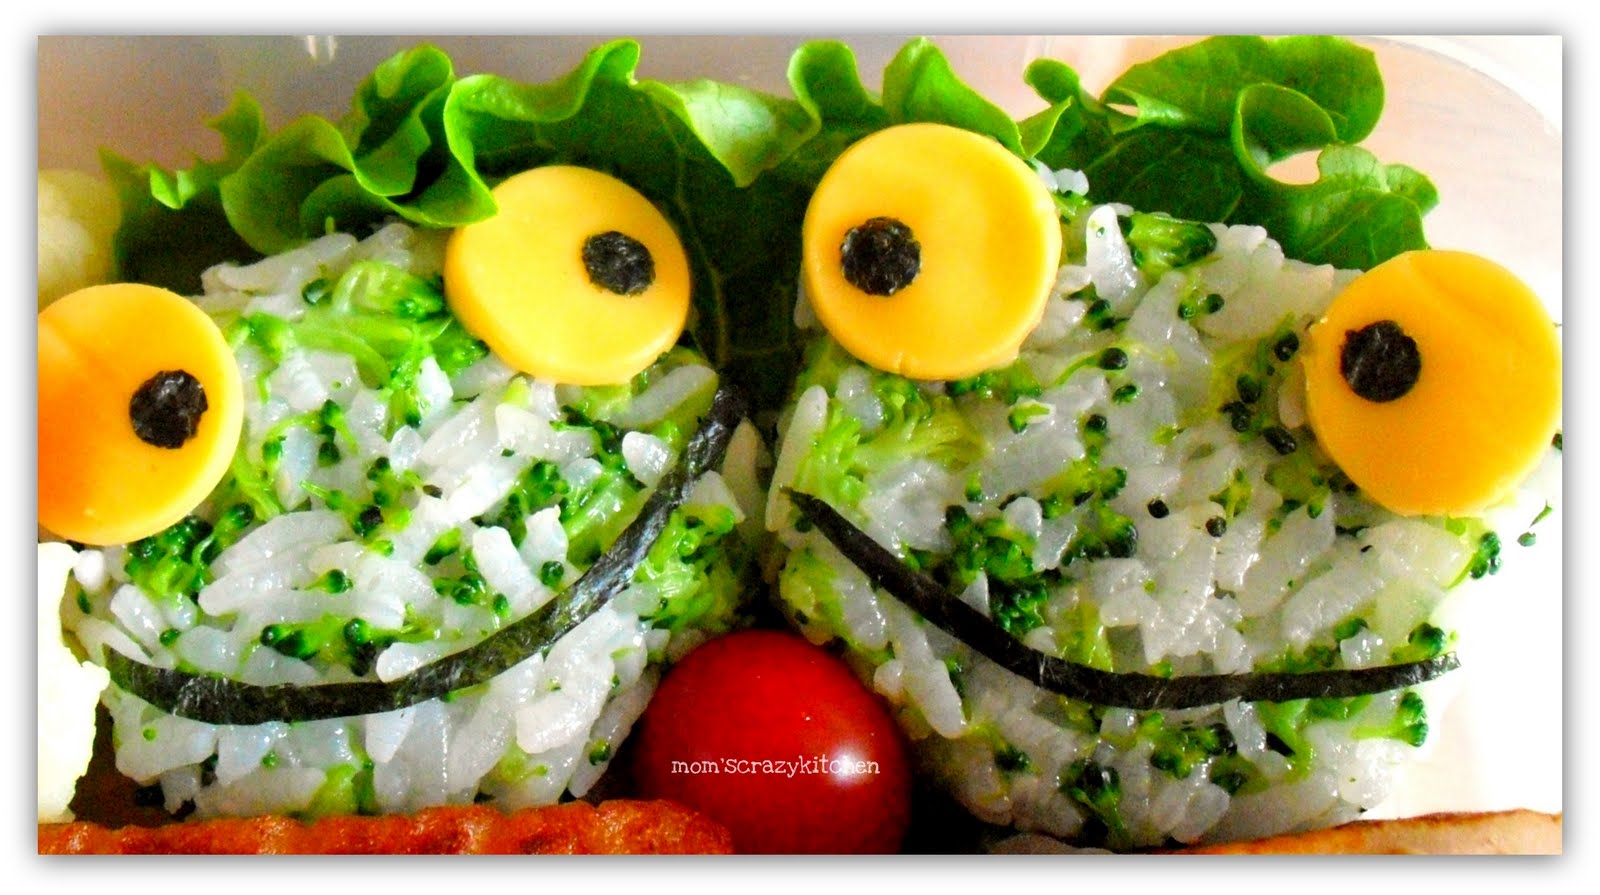
Is that why these two fellows are looking so frightened?
Or are they pleased to meet the ghost?


My boys are fans of Super Mario Bros. When we first arrived in the woods, the boys spent their time drawing Mario, Luigi, mushrooms and flowers. They created their own game scene too.

In the bento, we have rice, blanched broccoli, and pan fried chicken thigh fillet in black bean and garlic sauce. The idea of the Mario-Ghost came from Kaerenmama.

I put the rice in a plastic wrap, and shape the rice into a ball. With the wrap still around the rice, use your finger to indent the rice where the mouth should be. The sausage mouth will then sit nicely on the rice ball without sliding off. Then place the rice ball into a cupcake liner.

Slice a thin piece of sausage, to be used as the mouth. Cut some cheese triangles, and place them on the mouth. Put the sausage mouth onto the rice ball, where the dent is. Using a pair of scissors, or a nori face cutter, cut the eyes and eye brows, and place them on the rice ball. The hands were cut from a slice of fishcake. With a toothpick, dab some ketchup on the rice ball. Done! The ghost has rosy cheeks!


AHH! It's not one, but two ghosts! Help, Mario! Where is Mario?

Thursday, February 24, 2011

How about a Fish?


I was muttering to myself during dinner "What should I do for the bento tomorrow?" when Daring son KW answered "I know, a FISH!".

What an observant boy! He knows by now that the animals I put into the bentos have to be simple, and easy to make. He loves having animals in his bento, as he loves the eyes, which are usually made from cheese and nori.

I was watching a Hong Kong drama online that night and saw a Japanese Fish Kite in the show. Hmmm, maybe Darling son KW was right. I could do a fish for his bento. And so I did a search on the internet and came to Kaerenmama's blog. What a nice looking sausage fish she has there!


Since I was not keen to feed the boys only sausages for lunch, I pan fried some chicken thigh fillets, cut into bite size, to go with their lunch. When cooked, I poured a sauce over the pan of chicken thigh fillets, and they were ready to be packed in the lunch box when cooled.

2 tbsp Water
1 tbsp Miso (use less if need, depending on the type of miso you have)
1 tbsp Mirin
1/2 tbsp Soy Sauce

You can adjust the amount, depending on the type of miso paste you have. In fact, I used only half a tablespoon of miso paste, and added more water as I find the sauce too salty. Try the sauce and adjust the amount before pouring the sauce into the pan of cooked chicken pieces.


The remaining chicken went into hubby dear's lunchbox!
Here's some pretty tulips to go along with his lunch =)


Let's hope the tulips help to brighten their day, and the fish, to bring on a smile as they open their lunchbox!


Wednesday, February 23, 2011

A Flower To Brighten The Day!


It was starting to get cold again, and the sky was overcast. And I'm falling sick. Making a pretty flower for the boys' bento helped to brighten my day!

The rice is mixed with a little ketchup to give it some colour. Two cheese flowers were cut and overlapped, and pinned onto the rice with a jeweled food pick. Layering the cheese flowers felt like I was scrapbooking.

Don't you love those sparkling jeweled food picks?


In the bento, there's chicken karaage, broccoli, rice mixed with ketchup and top with cheese flowers, and two chocolate mushrooms!

I'm sure the boys will eat their mushrooms first!


For the time being, I'm happy with my flowers, real and edible, while patiently awaiting the arrival of Lady Spring =)

Tuesday, February 22, 2011

Hopping Back To School


Hi Froggy Pal, what are you looking at?
I'm looking at the many kids walking and hopping their way to school this morning! Let's join in the fun!


Finally the kids are back to school, after a 4-day school closure. It's a sunny morning, although colder than the previous week, and the kids are happy to be going back to school again. Watch out for the icy ground though ... you don't want to slip, fall and get a nasty cut!

In the bento, there is rice mixed with broccoli and vinegar, fried Japanese Fishcake, a few florets of cauliflower, and two grape tomatoes.

I'm glad the kids are back to school, and I'm back to bento making =)

Monday, February 21, 2011

Drawings


Monday, another day of school closure. This is the fourth day the kids are at home. What have they been doing? Work on their chinese, finish their school work, play, and draw.

Yes, they have been drawing lots!
Every day, I receive little pieces of drawings on aliens from Ben 10. They draw, they cut the figures out, and they stick these figures on pieces of construction sheets. The fact sheets, they call it. The above sheet of drawing was done by Darling son KW. He already started cutting out the aliens on the second sheet while I was busy taking photographs of the first!

I love their drawings! And yes, I have a huge pile of papers kept in a file ... their drawing collection =)

Let's hope school will be open tomorrow.


Sunday, February 20, 2011

Starfish or Flower?


Does it look like a starfish to you, or does it look like a flower?

Darling son has been coughing and sneezing the past week. I was just glad that his fever was gone. He had been eating the less oily, and easily digested meals for the past week. He had scallop porridge yesterday, and today, I cooked the porridge in chicken stock.

Eating porridge can be boring, especially if you do not like eating it.
"Hey, there's a flower in your porridge!", my effort in trying to make his lunch sounds interesting.

He ran over, looked at his bowl of porridge, and replied "It's a starfish!".

Oh well, it doesn't really matter, as long as he finish his meal. He did, and he asked for more grape tomatoes. He finished half the box of grape tomatoes I bought that afternoon.

Saturday, February 19, 2011

We love Noodles!


This is not your typical hawker style noodles. No oil is used in the sauce. The sauce is light and watery. It doesn't coat the noodles the way oyster sauce and ketchup cling onto the noodles.

The recipe for the sauce was adapted from Kentaro Kobayashi's "Easy Japanese Cooking - Donburi Mania". It can be found on the Reference Guide page, Noodle Sauce.

3 nos Chinese Egg Noodles
3/4 cups Water (The original call for 1.5 cups)
3 tbsp Soy Sauce (I use Kikkoman Low Sodium Soy)
3 tbsp Sugar
3 tbsp Mirin


  • Cook the noodles as per the instructions on the package.
  • When cooked, drain the noodles.
  • Rinse and drain the noodles in cold water.
  • Pour noodles back into the pot.
  • Mix the ingredients of the sauce together in a big bowl.
  • Pour the sauce over and mix well.
  • Serve noodles in a bowl, together with a good amount of sauce.

With that good amount of sauce in the bowl of noodles, you can slurp the noodles like you are eating noodle soup! It has the right amount of saltiness, with a hidden tinge of sweetness. You can taste the sauce before pouring it to mix with the noodles. Add more water if you find it too salty. Or more soy or sugar if you prefer it more salty or sweeter. I will definitely cook this again!


Friday, February 18, 2011

Banana Cupcakes


Another day of school closure.

Since the boys were at home, and I had some speckled bananas sitting in the pantry, I thought I would use them to bake some cupcakes for their afternoon snacks.

I was keen to use a different recipe, so I did a search on the internet, and found the recipe at AllRecipes.Com. The cupcakes were moist, and I would definitely cut down on the amount of sugar, if chocolate chips were to be included in the cupcakes.


I halved the recipe, and baked some mini cupcakes too. The boys loved the mini ones, as they could just pop one in their mouth. Hmmm, the mini ones were gone within an hour! I will the next time I bake these, I will only do the mini ones =)

The following is adapted from AllRecipes.com. I made some adjustments to the amount.

1 1/4 cups All Purpose Flour
1/2 tbsp Baking Soda
1/4 cup Unsalted Butter (I use salted butter and omit the salt)
1/2 cup White Sugar
1/4 cup Light Brown Sugar
1 Egg
3 Small Ripe Bananas, Mashed
1/3 cup Buttermilk (I use fresh milk)
1/4 cup Chopped Walnuts (I replace with mini Chocolate Chips)


  • Preheat oven to 350F/175C.
  • Line muffin pan with paper liners.
  • I use one 6-muffin pan and one 12-mini muffin pan.
  • In a small bowl, whisk together flour, salt and baking soda. Set aside.
  • In a large bowl, cream butter and sugars till light and fluffy.
  • Beat in egg, add in mashed bananas.
  • Add flour mixture alternately with the buttermilk to the creamed mixture. Start and end with flour.
  • Stir in chocolate chips, leaving a small amount to top the batter later.
  • Pour batter into the prepared pans.
  • Top the batter with a couple of mini chocolate chips.
  • Bake in preheated oven for 30 minutes, or till done.
  • The mini cakes should be baked before the bigger ones.
  • Remove from oven and let cool on a rack.

I didn't really measure the amount of chocolate chips I use. If you are going to use more chocolate chips, you may want to reduce the amount of sugar used. I would love to try this with some chopped walnuts or almonds the next time =)


Thursday, February 17, 2011

School Closure


This is the second consecutive day for school closure, due to significant absences of teachers who call in sick, in protest of Governor Scott Walker's proposal to strip collective bargaining rights of nearly all public employees. This not only affect our school district, but many other districts also issue a school closure notice for Thursday morning.

The boys were happy to be home, especially the little one, as he was still coughing and sneezing, after running a fever Sunday night. His fever went away on Monday, but came back again on Wednesday. So he had been staying home since Monday. No school, no bento. But things start getting boring, meals especially, when you eat at home two meals a day, for two days in a row. I just have to "dress up" their meals a little =)


Darling son YW's lunch for today ... rice in miso soup, top with some blanched broccoli and Japanese Fishcake. A very light meal, since he doesn't have much of an appetite. The elder boy gets his favorite baked chicken thigh fillet, alongside with broccoli, rice, two slices of fishcake and a bowl of miso soup.

"Will school be closed tomorrow??", they asked after lunch.

I seriously think that it will be. Teachers are in the job because they love teaching, despite that little income they get. If the Bill gets through, they are going to contribute more to their pension, which means an even lower take-home pay, and also pay higher insurance. They just want to be treated fairly. As one parent-teacher puts it "Care for your teachers as you would care for your kid". I couldn't agree more.


Tuesday, February 15, 2011

The "Starry" Dark Side


When you think of Star Wars, you think of Darth Vader, Yoda and the Jedi. Darth Vader may be from the Dark Side, but he is no doubt the "Star" there.

I bought the Darth Vader cupcake rings and light saber from ShopBakersNook. There is also the Storm Trooper cupcake ring. My boys were very excited to see these rings and food picks, and half of my purchases ended up with them. They kept asking me "Will you be using the light saber in the lunchbox any time soon?".

It was not that difficult to make the body of Darth Vader. I did a sushi roll, without any filling, although I did seasoned the rice with some sushi vinegar. It was a long and thin roll, just the right size for his body. Cut the two ends so that it fits nicely into the lunchbox. A slit across the roll near one end of the roll nicely fit the cupcake ring. There, we have our head attached, and the body. I cut another sheet of nori to put over the roll, so that Darth Vader now has his cloak on. While trying to get the roll into the box, I accidentally tore a corner of his cloak! So you see a star over the corner of the cloak, which nicely hid the torn portion =)

In the Bento, we have a rice roll, some florets of cauliflower, and pan fried chicken thigh fillet in black bean and garlic sauce (mixed with some sugar). The chicken pieces were put on a leaf of lettuce, so that the oil would not soften the nori holding the rice roll.

May the force be with you!

Monday, February 14, 2011

Happy Valentine's Day!


It's Monday, and it's Valentine's Day. Happy Valentine's Day!

The boys were looking forward to school this morning. They would be having a Valentine's Day class party today, and exchanging Valentines with their friends, to say "Thanks" to their friends for their friendship =)


In the Bento ... Pan-fried chicken thigh, a small piece of SPAM as the tree trunk and branch, broccoli florets, and overnight rice fried with egg.

I marinated the chicken thighs with some miso paste, sugar, mirin and soy sauce. The bag of marinated chicken thighs was left in the fridge overnight. Discard the marinade this morning, and pan fried the chicken thighs till cooked, and the skin crispy. Remember to cook on low to medium heat, as you don't want to burn those chicken thighs!

A joke Darling son KW brought home after his class party ...
Question: What kind of hat do cupids wear at construction sites?
Answer: A "Heart" Hat =)

Hope you have a great day today!

Sunday, February 13, 2011

Cooker-Claypot Rice


I was feeling lazy. The idea of using the rice cooker to do all the cooking was very appealing. Hence, I did a "cheater's" version of the claypot rice, without the cured meat.


3 tbsp Vegetarian Oyster Sauce
1 tbsp Dark Soy Sauce
1 tbsp Sesame Oil
8 pcs Dried Chinese Mushrooms

4 pcs Chicken thigh fillet (Deboned, skin removed, cubed)
2 cups Uncooked Rice
4-5 cloves Garlic


  • Debone and remove the skin from the chicken thigh fillet if necessary.
  • Wash and pat dry. Cut the fillet into bite size pieces.
  • Reconstitute the dried chinese mushrooms in warm, about 20 minutes.
  • Cut the softened chinese mushrooms into strips.
  • Put the mushrooms and cubed chicken pieces in a bowl.
  • Marinate the mushrooms and chicken pieces for at least 30 minutes.
  • Wash the rice, and add water accordingly.
  • Add the chicken and mushroom to the rice, together with the marinade.
  • Remove the skin from the garlic cloves.
  • Press the garlic with the back of the knife to "flatten" it.
  • Add the garlic to the rice, chicken and mushroom.
  • Set the rice cooker and cook.
  • When the rice is cooked, break up the garlic, fluff the rice and mix well. Serve the rice warm, along side with some vegetables.

You can set the rice cooker, go out for your grocery shopping, or bring the kids for their morning swim class, and come home with lunch awaiting for you! A simple meal on a busy weekend!

Friday, February 11, 2011

100 Days of School!


Today is the 100th day of school! Activities for "100 Days of School" are lined up for the K/1 students. My boys love travelling on the Yellow School Bus. And, they were delighted to see the Yellow School Bus in their lunchbox this morning. On the way to school, I told the boys "Enjoy your 100th day in school", and Darling son KW said "Not for me".
The 2/3 students don't have activities lined up for them ... they are already counting beyond 1000!


Since I was busy in the kitchen, hurrying to pack the second bento, I requested Darling son KW to help take photographs of the first bento. He was all dressed up, snow pants and jackets, and was happy to oblige. After taking a few photographs, he realised that he had a little time to spare, and so he decided to try to take a self-portrait. He was so pleased with his photo shot, he ran into the kitchen to show me! "It was a good shot", I told him. So he went to school this morning, very, very happy indeed.


In the Bento, we have Ham flower, Sausage flowers, and many florets of broccoli! To all K/1 students ... Enjoy the activities for your 100th day of school!


Thursday, February 10, 2011

Bear-Hug


Are you ready for Valentine's Day? How about a Bear hug for you today?


In the Bento ... Rice seasoned with some Furikake, florets of broccoli, and pan-fried chicken.

The pan-fried chicken pieces were marinated with some miso paste, honey and shaoxing wine. It was then left in the fridge to marinate overnight. I melted some butter in the frying pan, and together with a little olive oil, panfried the chicken pieces till cooked and browned. Left them on a kitchen towel to soak up the excess oil before I packed them into the lunchboxes.


Tweet, Tweet, Tweet! Someone from the other box is smiling at me!


Hello! I'm Mr Prawn, and I have some work to do in the other bigger box!


Here's the lunchbox for hubby dear. The rest of the chicken pieces were packed into his lunchbox. I added some prawns, cooked in salted water, and cauliflower. He definitely wouldn't want a Bear Hug, so a worker prawn should work fine for him =)


Wednesday, February 9, 2011

John Deere Tractor


We associate the words "John Deere", with farm and construction vehicles.


So here's the guy who works on the farm.
My little boy said "He looks just like me!". Definitely, the spiky fringe!
Don't you love the cool "John Deere" hard hat?


My weak attempt in making a John Deere Tractor with rice ... rice mixed with cut up broccoli, to get the green body of the tractor. Not quite like a tractor, even with the outline, I had to admit =p


In the bento ... Baked baby corn, mini "Hanbagu", rice, and rice mixed with broccoli. Can you see the exhaust pipes and side view of the steering wheel on the tractor? It's no wonder Darling son KW asked "Mama, what's that green thing suppose to resemble?". Oh well, Mama will have to work harder in cutting up the broccoli and mixing it well with the rice the next time =)

Tuesday, February 8, 2011

Meet Mr Walrus-Bento!


Meet Mr Walrus-Bento ....


.... and his friend!

They live in the Arctic. How much do you know about walruses?
What is the first thing you notice when you see a walrus?


Yes, the long tusks! But Mr Walrus-Bento has a pair of short tusks.
He looks more friendly.


Darling son YW just completed a unit on Arctic Animals in school.
Hence, the Mr Walrus-Bento. I coloured the rice brown by using a little of low-sodium soy sauce. Mr Walrus looked better in brown than white.
A "jeweled" nose, and a nice warm winter hat for Mr Walrus.

In fact, the boys got to chose the winter hats for their "Mr Walrus" during dinner last night. They also get to pick the colour for the "jeweled" nose. It was fun, being able to chose the items for your lunchbox!

In the bento, we have ... Chicken Karaage, and Broccoli florets.
A simple meal for the boys.

Monday, February 7, 2011

Three Bears .... But Where Is Goldilocks?


Yes, the three bears are looking for Goldilocks! They looked right .....


They looked left ... they looked everywhere!
But there was still no sight of Goldilocks! Where did Goldilocks go?


In the bento ... Three Rice Balls, Broccoli Florets, Pan-Fried Teriyaki Chicken Thighs.

The chicken thighs pieces were marinated in some Shaoxing Wine, and left overnight in the fridge. This morning, I took out the bag of chicken pieces, discarded the liquid in the bag, and pan fried them in a pan coated with a little butter and olive oil. Make sure to cook the chicken pieces thoroughly. Once they browned, remove and leave on a kitchen towel to soak up the excess oil. Remove the excess oil in the frying pan with a kitchen towel. Pour the sweet sauce, comprising of 1 tablespoon of mirin, 1 tablespoon of soy sauce, and 1 teaspoon of sugar. Give it a quick stir, put the chicken pieces back in to the pan and coat the chicken pieces with the sauce. Left cool before packing into the lunch box.

I had 2 medium pieces of deboned and de-skined chicken thighs. Adjust the amount for the sweet sauce based on the number of chicken thighs you have.

Now that the three bears have gone to school, it's time for me to look for ... Goldilocks?

Sunday, February 6, 2011

Japanese CheeseCake!


I have to put an exclamation mark on the title. It's my 6th attempt.
The cheesecake is soft and cottony, and the chilled version is "melt in your mouth". Finally!

The first time I made this cake, the bottom of the cake had this distinct yellow, agar-agar look alike base. But the body of the cake, at least the upper half, was soft and cottony. It was a failed first attempt, despite the heavenly taste of the cake. We happily ate the upper half of the cake, and threw away the bottom half, sadly.


Don't you think the base of this successfully baked cake look like tissue paper? The base of the first cake was no where like the one in the photo =(

Not wanting to admit defeat, I attempted to bake it a second time.
This time, it was better. However, in my hurry, I didn't fold in the flour properly, resulting in tiny lumps of batter. The taste ... still as good, though we couldn't have a full edible cake!

So I tried again, and each time, either the cheese couldn't dissolve properly, or I didn't mix the egg white batter evenly with the cream cheese batter.
Hubby dear would probably say that I'm stubborn, but this "Never Give Up" spirit finally yielded a nice yummy, uniformly baked CheeseCake! It's crazily addicitive!


Here's some points I gathered from my various failed attempts:

  • Do not add the egg yolks while the cream cheese mixture is still hot. You definitely do not want the yolks to be cooked in the cream cheese mixture!
  • If after stirring for the longest time, you still couldn't get the tiniest bit of cream cheese to dissolve, pour the mixture through a sieve. You will get a smooth and silky cream cheese mixture!


  • Make sure the flours are mixed well into the cream cheese mixture. You don't want any lumps in your cottony baked cheesecake.
  • Make sure to mix the whipped egg whites evenly with the cream cheese mixture. You do not want streaks of yellow in your cake. However, do not overmix the batters either.
  • There is no need to grease the pan. Just line the pan with parchment paper, with sides at least 1.5 inches above the rim of the pan.


  • The cake may look baked by the 45th minute, even though the time required is 1.5 hours. Do not take the cake out. Let it bake fully, and tent the top of the cake loosely with aluminium foil if the top of the cake starts to brown too much. Remove the foil during the last five minutes of baking.

Recipe adapted from Aunty Lily's Blog.


100 ml Heavy Whipping Cream or Full Cream Milk
50g Butter
250g Cream Cheese (I use 1 block of 8oz cream cheese, apprx 230g)
60g Al Purpose Flour
20g Corn Flour
6 Egg Yolks
6 Egg Whites
1/4 tsp Cream of TarTar
140g Sugar


  • Take the block of cream cheese out to soften at room temperature.
  • Separate the egg yolks and egg whites, with the egg whites in a medium mixing bowl.
  • Line a 8" square pan with parchment paper, with the parchment paper extending an extra 1.5 inches above the rim of the pan.
  • Double boil milk and butter on medium heat.
  • When the butter has melted, lower heat and add in cream cheese.
  • Remove the bowl of cream cheese mixture from the heat.
  • Pour the mixture over a sieve, into a large mixing bowl, to remove the tiny lumps of undissolved cream cheese. The cream cheese mixture has to be in a large mixing bowl as you will be folding in the whisked egg whites later. If your cream cheese mixture is smooth and silky, there is no need for this step.
  • Slowly add in the flours and mix well. You don't want any lumps of flours in your cream cheese batter. You should get a smooth mixture. Add the egg yolks and mix well. Set aside the large bowl of cream cheese mixture for later use. In a medium mixing bowl, whisk egg whites till foamy.
  • Add the cream of tar tar and whisk on the highest speed.
  • Gradually add the sugar as you whisk.
  • Continue to whisk the sugar and egg whites till peaks form.
  • Use a rubber spatula to fold the egg whites in two batches to the cream cheese mixture.
  • Pour the mixture into an 8" pan lined with parchment paper.
  • Steam bake in a preheated oven of 300F/150C for about 1 hour 30 minutes.
  • If you are using a springform pan, wrap the pan with heavy duty aluminium foil to prevent any water from sipping into the cheesecake during baking.
  • Tent the cake loosely with an aluminium foil when the top of the cake starts to brown.
  • Let the cake cool in the pan on a cooling rack for 15-20 minutes.
  • Turn the cake onto a plate. Remove parchment paper.
  • Invert the cake back onto the cooling rack.
  • Continue to cool for another hour or so.
  • The cake will shrink as it cools.
  • Chill the cake in the fridge after the cooling.

Like I said, it's crazily addictive. Darling sons came home from school and had two slices each, the unchilled slices. They brought the chilled slices to school as snacks. There won't many pieces left after that. Seems like I need to bake this cake again!


Saturday, February 5, 2011

Pan-Fried Salmon Steak


We were happy when we saw this salmon steak at the supermarket. Most of the salmon we saw at the supermarket were salmon fillets. Somehow, the texture is different from that of a salmon steak. Of course, we were delighted to pan fry the salmon steak for dinner =)


1/2 pound Salmon Steak
1 tbsp Mirin
1 tbsp Soy Sauce (I use Kikkomann's Low Sodium Soy)
1 tsp Sugar
1-2 tbsp Butter/Olive Oil


  • Wash and pat dry the salmon steak.
  • Heat up a frying pan.
  • Add butter/olive oil to coat the pan.
  • When butter/olive oil is hot, carefully add the salmon steak.
  • Make sure the steak is dry, or the oil will splatter.
  • Pan fry on medium heat, till one side is browned.
  • Turn over and continue to pan fry till both sides are browned, and the steak is thoroughly cooked.
  • Remove salmon steak from pan.
  • Using a paper towel, absorb the excess oil if any, leaving a little in the still heated pan.
  • Mix the marinade in a bowl, and pour into the pan.
  • Give it a quick stir, remove and pour over the salmon steak.
  • Serve warm.

The salmon steak were fried till crispy on both sides. The sauce adds a nice sweet taste to the meat, with a tinge of saltiness. A bit of cleaning up to do after the frying, but well worth the effort!

Friday, February 4, 2011

The Bunnies Strike ... Again!


It is lonesome when there's just one of you .... zzzzz .....


Add another ... oh so sweet!

A pair of bunnies to celebrate the second day of the Chinese New Year!
Do I hear you say ... Valentine's Day??

Making these Bunny Maki Sushi was not that difficult.
Thanks Susan, for sharing the "How To".
Hop over to Hawaii's Bento Box Cookbook - Bentos and More for Kids, for a detailed step by step instruction on rolling the Bunny Maki Sushi!


My little boy ran over while I was packing the sushi into the lunchbox, and said .. it's a pig! Haiz! A pig with long bunny-like ears? Maybe I should just remove the slice of cheese ...

Anyway, in the bento ... Bunny maki sushi made with SPAM and sausage, and broccoli florets.

A "no fuss" meal, according to my elder boy.
"I don't have to decide what to eat first. I just pick it up and pop it into my mouth!" said Darling son KW.

Related Posts with Thumbnails